


Skyrim modding 101
The Definitive 2015 Guide
- Foreword
- Some general information about modding
- Prerequisites
- Installing the toolset
- Modding our Skyrim install
- Taking it from here
- FAQ / Do’s and dont’s
- Conclusion
Foreword
OK, so you’ve played Skyrim before, maybe on a console, maybe on the PC, and you decided that from now on, things will be different. Things will be better. Things will glorious! You will be modding Skyrim!
But after a few nights of reading up on the tons of information that can be found on the internet, it hits you. You’ve simply got no idea what mods to try, what fixes to use, what tools to pick, from the enormous world that is Skyrim modding.
Fear not! After following this guide you will (hopefully) have a complete tool chain that can be used to further alter your Skyrim installation, and a basic modded Skyrim installation with (very basic) utility mods that I feel everyone should have.
I must warn you that my native tongue is Dutch so this guide might be written with a few spelling errors here and there, but I hope you can ignore the mistakes I make at expressing myself, and get the gist of what I’m trying to explain when it comes to modding Skyrim.
Some general information about modding
Skyrim, like lots of Bethesda games, can modded by “replacing” the base resources like textures, sounds, etc., or rather, by adding more files to your Skyrim installation. The game then loads the files you added instead of the files it originally came with, essentially replacing them.
When downloading a mod for Skyrim, the downloaded archive can consist of various types of files and folders, as seen below:
| Type | Seen as | Description | Load order |
|---|---|---|---|
| Elder Scrolls Master files | .ESM files | These are the large base files that contain most of the game and are provided by e.g. Skyrim or a Skyrim DLC. | Managed by a mod manager. |
| Elder Scrolls Plugin files | .ESP files | Modifies values and adds scripts to Skyrim. | Managed by a mod manager. |
| Resource files | Loose files in a folder structure | Can contain anything: sounds, textures, models, translations, etc. | None, conflicts are solved by overwriting resources when extracting to the data folder.* |
| Resource files | .BSA files | The same as loose files, only packed into a .bsa archive. | Loaded before any loose resources if I’m not mistaken. |
* This is not entirely true, as I will explain later on when installing Mod Organizer.
So, in order to have a mod that adds a new super smart monster that can hunt in packs to the game, both the ESP that loads the monster’s AI and the resources files that are used for displaying the monster must be loaded by the game.
Later on we will see how we can do this exactly, but before all that, let’s make sure we have the right tools to begin with.
Prerequisites
Before we start cooking up our custom Skyrim installation, we must make sure that we have the right basic requirements.
- A nexusmods.com account. And don’t forget to whitelist their ads in your adblock.
- Skyrim with the three DLC’s Dawnguard, Heartfire, and Dragonborn
- Windows 7 or 8
- A PC that can run vanilla Skyrim to follow this tutorial, or a super fast PC if you plan on adding lots of graphical mods.
- Around 25-50GB of free disk space for mods
Just to give you an idea what hardware and software I’m running, this is my current setup:
- Operating system
- Windows 7 x64
- Skyrim distribution
- Steam, with all three DLCs
- Processor
- Intel i5 3570K
- Memory
- 16GB DDR3 1866Mhz
- Video card
- AMD Radeon R9 290X
- Hard disks
- 550MB/s SSD for OS and other stuff, 250MB/s SSD for Skyrim and other games
I recommend sticking with a 64 bit variant of Windows if you can, this probably won’t do you any real good regarding Skyrim (aside from ENBoost maybe), but will certainly not harm you either.
Using other versions of Windows or using the non-Steam retail version of Skyrim should probably work equally well, although I cannot really help you there when it comes to solving problems.
Of course I will not support pirated software in any shape, way, or form, so don’t even bother bringing that up.
Most recent hardware should probably work quite well, although hardware that is much slower than my rig is might struggle with a heavily modified Skyrim installation, so your mileage may very.
Installing the toolset
The tools we will be discussing here are tools that are used for managing / configuring the various mods we will be adding to our Skyrim installation.
Mod Organizer
Mod Organizer is a mod manager. A mod manager helps installing and uninstalling mods properly, and manages the load order and conflicts of mods and resources.
Basically 3 well known mod manager exist: Nexus Mod Manager or NMM for short, Mod Organizer or MO for short, and Wrye Bash. In the past I’ve used all three of them, and MO is my tool of choice. Feel free to experiment with any of them, but I will focus only on Mod Organiser in this guide as I feel it’s the best pick of the bunch and this guide would be 5 times longer otherwise.
| Nexus Mod Manager | Wrye Bash | Mod Organiser | |
|---|---|---|---|
| Conflict info | Not available | Available | Available |
| Conflict resolving | Not available | Fine grained | Mod based |
| Mod combining * | Overwriting files | Overwriting files | Virtual filesystem |
| nmm:// links | Yes | No | Yes |
| Interface | Very easy | Complicated | Pretty easy |
* The main reason I use Mod Organizer, is that it manages mods in a unique way: instead of extracting every mod into the Skyrim data folder, it extracts every mod in it’s own separate folder somewhere else on your disk. When Skyrim starts, it programmatically hooks into Skyrim, and assembles a virtual filesystem in which all mods are placed together which is then offered to Skyrim. Skyrim does not know that this filesystem is not actually a filesystem that exists on your hard drive, and will happily load your mods and resources from this filesystem.
This means that when I explained above that resource files are all dumped into the Skyrim data folder, overwriting each over in case of a conflict, this is no longer true because we keep them separated and choose what mod would have overwritten what other mod in case we dumped the resources into the Skyrim data folder.
Using this way of managing mods makes absolutely sure that the right mods and resources are served every time when a bunch of mods are installed or uninstalled.
It also makes it very quick and easy to temporarily enable or disable certain mods, because disabled mods will simply be not included in the virtual filesystem the next time Skyrim is started.
The other mod manager need to physically add or remove mods and resource to or from your data folder, and need to place back any previous versions of resource files like textures when uninstalling a mod, if those resources were previously overridden by the mods you just uninstalled. In order to do so, they need to keep track of what file was overridden from what mod by what other mod, and I feel that this can be a fragile way of working out conflicts.
Mod Organizer, on the other hand, can simply completely remove the seperately stored mod folder without even keeping track of anything, because if any other mod changes the same resource our mod did, that version of the resource will automatically come up in the virtual file system the next time Skyrim is started.
Go ahead and grab Mod Organizer from here and install it anywhere on your hard disk.
After installing MO and starting it for the first time, you are greeted with the screen displayed below:
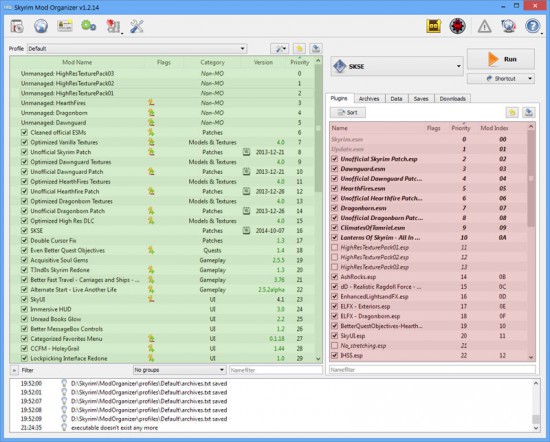
I explained before that the ESM and ESP files are loaded in a specific order, this loading order can be seen in the red part of Mod Organizer.
The order in which resource files overwrite each other is seen in the green part of MO. Dragging a mod below another mod makes that mod’s resources overwrite the resources of the mods above, in case of conflicts.
When starting Skyrim, the virtual filesystem automatically resolves conflicts by only including the conflicted resource from the mod that is the lowest in the list.
For example: let’s say we installed the fictional SummerLeafs mod which contains some textures of leafs, together with the Autumn mod, which happen to contain the same texture files, only now in a brownish autumn color. Depending on the resource order in the green list, either the bright green summer leafs texture or the brownish autumn texture will be loaded.
When lots of mods contain both resources and ESPs and the order in which the ESPs are loaded are wildly different from the order in which the resources are loaded,
A detailed guide on Mod Organizer can be found here and is definitively worth a read!
LOOT
Mods can consist of separate resource files for e.g. replacing textures with high res alternatives, but lots of mods feature one or more ESP files that change the behavior of the game and make the mods actually work. These changes to the game must be loaded in a specific order because one mod may rely on the other. If this is not done properly, things may crash or become unstable.
Two tools exist to automate this process by looking up the correct loading order in a big online database: BOSS and LOOT.
BOSS is around for a while longer and whilst they both practically do the same, I once read that LOOT can intelligently position a mod that is missing from the big DB by looking up what they modify and what other installed mods modify, where BOSS would simply fail. So, my choice has become LOOT.
An embedded version of LOOT is included in MO but I prefer installing the normal version of LOOT, so we can update it and not be stuck with the version MO gives us.
Grab it from here and install it. After you’ve installed it, fire up MO, click the green and blue gears, and add LOOT as a MO Executable by filling in the title and binary. Next select LOOT in the big dropdown on the right side, and in the smaller Shortcut dropdown select Toolbar. LOOT should now be up in the toolbar on the right top side.
Tes5Edit
Part of the reason that the loading order is so important, is that various mods can change various variables in the game, so multiple mods can modify the same variable. Imagine a MakeEverythingBigger mod and a MakeEverythingSmaller mod, both modifying the same variables, only with different values. Depending on the loading order (which we will set with MO / LOOT) everything will either become bigger or smaller, thus one mod is overriding the variables of the mod loaded earlier. This is why loading order matters, but the next scenario is much more important:
Imagine yet another mod, our beloved MakeEverytingRed mod. The creator of this mod modified some color variables, but accidentally also changed the size variables our other mods are modifying as well. He quickly realized that his mod only should make everything red, not bigger or smaller, so he changed those size values back to 1.0.
We now install the MakeEverythingRed mod, order it after the the MakeEverythingSmaller and MakeEverythingBigger mods, load up our game, and now we no longer see the size changes by either of our earlier installed mods… Instead the size of everything is exactly as if no size mods were installed.
What we see here is that the mod that is supposed to make everything red, is, when it is loaded, setting the size variables to 1.0 again because these values are explicitly added to the mod, even though they were set to 0.5 by the MakeEverythingSmaller mod, and later on to 1.5 by the MakeEverythingBigger mod. We call this an unclean mod with ITM records, which, and mods like these should be cleaned.
The tool that can clean mods (amongst other things I have no idea of) is called Tes5Edit and can be found here. Grab it, install it, and add it to the MO Toolbar just like you did with LOOT.
Now we’ve added all the needed tools for managing our Skyrim installation. That wasn’t so hard, now was it?
Modding our Skyrim install
With the tools now installed, we will start modding our Skyrim installation in this section.
SKSE
First off we need SKSE. SKSE stands for Skyrim Script Extender and is required by a lot of mods. It makes the life of mod creators easier by offering binds and functions that are normally not available in Skyrim, on which mods can be built. Grab the latest version from here and extract it to your Skyrim installation folder, so that skse_loader.exe is located in the same directory as TESV.exe.
SKSE is a loader/wrapper for TESV.exe, so start Skyrim via skse_loader.exe from now on. The easiest way to do this is to add it to MO so it ends up in the big dropdown, and leave it there. I have SKSE preselected in the big dropdown in MO, so to start Skyrim I just hit the Run button. Also check the box “Close MO when started” for SKSE to make some free room when playing Skyrim.
Cleaning the master files
Earlier I explained how ESM and ESP files can be cleaned by Tes5Edit. What I didn’t tell you was that instead of the mod creators, Bethesda is actually the one that leaves dirty edits in their ESM files and they don’t really seem to care. This is rather strange, considering Bethesda is a developer that greatly supports modding their games by the community. Anyway, because we will be installing the Unofficial Skyrim Patches, which will be loaded intermittently between each DLC, we must clean the ESM’s first to prevent problems.
Cleaning the ESM files is done rather easy once you understand what it’s all about but is rather hard to explain by writing it down. Luckily, one of my favorite Skyrim sources, Gopher, clearly explains cleaning your ESM files in this brilliant video:
Gopher mentions that every time Bethesda updates Skyrim, the master files must be cleaned again. This is also true for checking the local game cache with Steam, as it will re-download the modified files. Verifying the local game cache is quite handy once you start installing ENB’s and can’t really keep track of what file is what.
Because we use MO however, we can prevent losing our cleaned ESMs every time we use Steam to check the local game cache: simply create a folder called ‘Cleaned Official ESMs’ in your MO mods folder, and copy the cleaned ESM files from your Skyrim data folder in there. Now Steam can check the local game cache all day long, but MO doesn’t care and will serve the cleaned variants to Skyrim in the virtual filesystem.
Just don’t forget to create new cleaned ESMs once Skyrim is updated via Steam, or you will be stuck with the old versions!
After you’ve cleaned your master files, you are ready to install your first few mods \o/
Official High Resolution Texture Pack
This texture pack contains textures which are bigger than the original textures, but still don’t look nearly as good as some of the texture packs out there. Grab it nonetheless, because it’s a good starting point in case we don’t replace all textures with very high resolution ones. In fact, some modders rely on some of the textures in the HD pack like distant mountain textures being “good enough” and thus are not replacing them. It can be easily installed from Steam as a free DLC here.
Installing mods everyone should have
The mods we will be installing are utility mods and will not change the vanilla gameplay whatsoever, but only enhance and optimize it. Even if your PC is not super fast, you should be able to make it to this point, as the only real “performance hungry” mod we installed is the official Skyrim HD Texture Pack.
- SkyUI
- A complete UI overhaul that greatly improves the menus. This should have been in Skyrim all along.
- Unofficial Skyrim Patch
- Fixes lots and lots of small (and not so small) bugs in the game like floating trees, missing sounds, broken quests, etc.
- Even Better Quest Objectives
- Wouldn’t it be fun if instead of “Go to Person X” the game would actually tell a bit more so you know what to do and where to go? This takes care of that.
- Double Cursor Fix
- Alt-tabbing to the desktop and back ingame will make you end up with both the Skyrim cursor and the Windows cursor. This mod fixes it, so you can alt-tab with confidence.
- Better MessageBox Controls
- This mod aligns the click sensitive areas with the actual options in dialogs etc., making it much easier to use the mouse properly.
Head over to Nexus Mods and click the ‘Download with Manager’ button on the abovementioned project pages.
MO will start downloading the mods to the download folder. Once downloaded, klik the top most left button to select the downloaded archives one by one, so MO will install them into the Mods folder and display them in the Plugins overview, the Resources overview, or both (depending on the type of mod).
Now to order the mods properly click Loot in the top right bar where we pinned it, and in the Loot window simply click ‘Sort Plugins’.
After Loot is done querying the online DB and sorting, , it will show an overview of the to be applied sort order. Klik Apply, and you will see an overview of what mods you currently have installed.
Under the details tab in the top left, Loot shows what mods are dirty and should be cleaned, so make sure you do this and give the mod author a heads up so you make the community a little bit better!
Now that we have all the right tools in place and even installed and sorted a few mods, it’s time to expand our view and add a ton more.
Taking it from here
At this point you should get the basics of Skyrim modding, and you might decide you feel confident enough to start exploring on your own. I have a fairly complete list of mods you probably are going to try out sooner or later, so I suggest you stick around for a little while longer and see what we will cook up next.
Visuals visuals visuals!
First stop: Visuals. Skyrim is known for it’s yaw dropping visuals when modded to perfection, and we are trying to achieve just that.
In the years I’ve used TPC and later on SMC (see the F.A.Q. below why I stopped using it), and so I gathered a few texture packs from all over the internet.
My ever changing list of texture packs installed currently consists of the mods below.
These are listed in loading order, and are loaded after the official HD Texture pack of course:
- Static Mesh Improvement Mod
- Skyrim HD
- Serious HD Retexture
- Skyrim Realistic Overhaul (currently not on Nexusmods)
- Langleys Textures Workshop
- Septim HD
- Ethereal Clouds
- Horizon of Dreams
- Bumpy Inn and Shop Signs
- Business Ledger HD Retexture
- Book Covers Skyrim
- Ash Rocks
- Skyrim Flora Overhaul
- Higher-Poly Skyrim
- Weathered Road Signs
- Designs of The Nords Banners
- PAPER HD 2K
- AOF Detailed Mountains
- Real Roads for Skyrim
- Fences of Skyrim
Below the texture mods I’ve got a few lighting mods installed as well.
Again in order:
- Project Reality – Climates of Tamriel V3
- Enhanced Lights and FX
Once you’ve got those installed, things should start to look really good already.
Adding an ENB
ENBs improve the post-processing part of the game and thus the total image. This can include anything from color enhancements, depth of view, water shaders, texture rendering fixes, certain types of antialiasing, and a few more. ENBs provide the most radical graphical change of any mod, but overall have the biggest impact on framerate as well.
One of the most well known and widely used ENB presets is RealVision, this is the ENB preset I am using as well.
Installing an ENB is always a bit of a challenge and boils down to reading the readme of that specific ENB really well. It typically lists a bunch of mods it depends on to get the image just right, and you shouldn’t be surprised that most of the requirements RealVision has, are in the abovementioned mod list, so you should be about ready to go.
ENBs are installed in the top level directory of Skyrim, where we also installed SKSE. Due to copyrights, most of the time only the ENB preset is packed, not the ENB version itself. These need to be downloaded from the author’s website, but a link is always provided with the ENB.
No tool currently exists (other than some java tool that I didn’t get to work) for managing ENBs, so remembering what files came with the ENB can be a bit of a struggle. Remember when I spoke about verifying the local game cache with Steam? I sometimes use that to remove ENBs by removing most of the files from the top level folder after which I check if I accidentally removed one file too many.
F.A.Q. / Do’s and don’ts
Q: I really like TPC / SMC! Why don’t you?
A: Well, I really like it too! Once you gather most of the mods in it, it covers almost every visual aspect of the game. The problem I encountered however, was that it was really hard to keep it stable, whilst most of the mods are so small that you don’t really miss them. So I started building my own set of mods that have the most visual impact without instantly getting to the point of instability.
Q: What about crossfire or SLI? Should I add another graphics card to my PC?
A: Unfortunately, no. I now own a 290x but right before that I used to own a crossfired dual 7970 setup. The problem is that Skyrim, being a DirectX 9 game, really is not optimized for multi GPU PC’s. While some ENBs exist that can make proper use of crossfire, this seems to have to do with disabling certain Depth of View settings in them. I never really got it to work really well, and always saw a bit of flickering in the image at best. Skyrim was the reason I sold my 2 HD7970’s and got a 290X instead which might be slower in absolute power, but works much better in Skyrim.
Q: I’ve got a question you didn’t answer!
A: Contact me on one of the social links on top, or leave a comment below, and I will try to do my best to get back to you.
Conclusion
So, there you have it. All I know about modding Skyrim is written down in this tutorial, and hopefully it was helpful. From here on out you’re on your own kiddo. Go out and slay some dragons.